Showing posts with label DIY. Show all posts

Sunday, March 16, 2014

Kiss Me I'm Irish! Happy St Patrick's Day x


{{ click pictures for link through}}

Happy St Patrick's Day! 
Put on your lucky green dress, drink up & start looking for that pot of gold - it's time to celebrate! :)

♥ Modcloth, Lucky be a Lady dress
Sofies Big Day, Rainbow tassel garland

THE ICONIC, Gold glitter belt
Modcloth, 'S Marvelous heels
♥ Velvet Volcano, Sparkly rainbow necklace
♥ Love from the Oven, St Patrick's Day gold coin cupcakes
♥ Super Mum, "So Lucky" printables
Home Cooking Memories, Lime sherbert floats


   photo LFAsignature14.jpg

Friday, March 22, 2013

Friday, February 1, 2013

Bonjour! How To & Review - French Knitting Bee

Bonjour and welcome to the first luvfromamy product review :-)
Today I am going to share my thoughts and experiences with the French Knitting Bee
Photobucket

I often noticed the French Knitting Bee while shopping at my local craft store, the cuteness of the product caught my eye even though I wasn't really familiar with french knitting (That's right... I hadn't heard of French Knitting.. Ha and I call myself a crafter!). One day after "umming" and "ahhing" in the wool aisle for quite some time I decided to purchase this little Mr and give him a go.

If you're not familiar with this product or French Knitting
in general, here's a quick little run down! 

French knitting, or spool knitting as it's often called, is a fundamental knitting style that uses a spool and pegs (usually 4 - 5 pegs) to create a tube like, woven cord. Depending on the diameter of the spool, your cord will be very narrow with minimal elasticity or wide with a lot of stretch. Your "spool" can be anything from a purchase knitting bee like mine or an antique "dolly" spool of your grandmas!

The knitted cord can be used for a variety of accessories and home decor pieces such as bracelets and coasters - great huh?!
 photo astri_zps4b9a6e0c.jpg

Now that you're in the know, let's continue on with the French Knitting Bee how to guide :-)

You can purchase your own French Knitting Bee in a variety of colours from your local craft and haberdashery store, such as Spotlight or Lincraft.

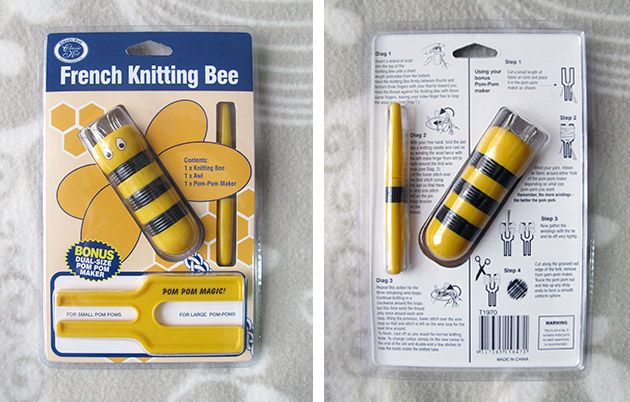
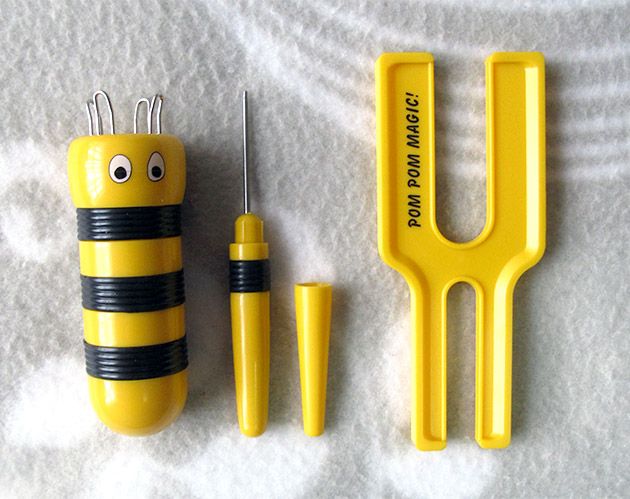
You will receive:
The french knitting bee (FKB)
The awl to assist with weaving/casting
Bonus "Pom Pom Magic" pom pom maker (PPM)

Photobucket

Photobucket

The packet lists handy instructions on how to use the FKB and PPM, but I find learning from others to be quite helpful too. Hopefully the below instructions and pictures can assist you! :-)

(Please note: My method is a little different to the instructions on the packet, if you have any questions please don't hesitate to ask! First difference is I cast on CLOCKWISE rather than anti-clockwise. As far as I am aware there is no difference with the finished product, I just find it a lot easier and far more natural to work in this pattern!)

1. Firstly, you must insert a thread of yarn into the top opening of the FKB. Continue the yarn through the "body" of the spool until a little length of yarn protrudes from the bottom (almost like a tail haha!)

TIP: If you are finding it hard to thread the yarn through the bottom opening, a crochet hook can be a handy "yarn grabber". Also, make sure you keep a light grip on the yarn "tail" as this is a very important part of spool knitting! :-)

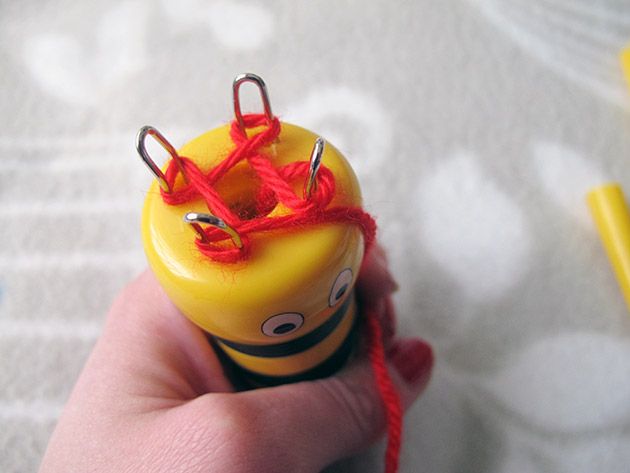
2. While holding the tail, take the "top section" of yarn and loop it around the first peg in an "e" like shape (going clockwise around the peg). When done correctly you will naturally go to loop around the next peg, to your right, in the same fashion. Overall you are going in an ANTI-clockwise motion around the spool, but you will be wrapping the "e" shapes clockwise around the pegs. Keep looping these "e" shapes until you have looped all four pegs like the below image.

Photobucket

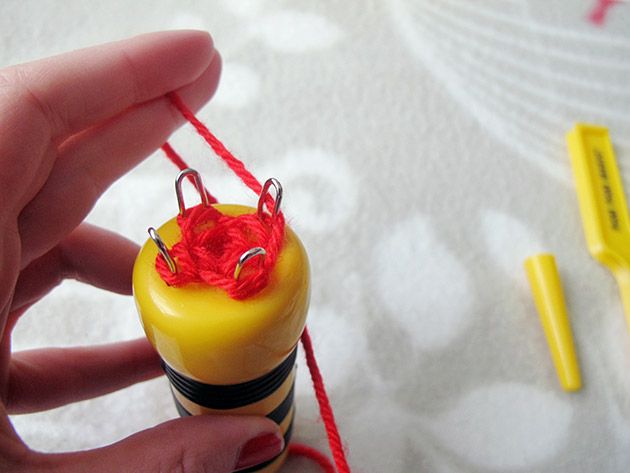
3. Take the "top section" of yarn anti-clockwise with your left hand and position it ABOVE your "e" loops on the first and second peg (pictured below). Now we begin to introduce the awl into French knitting :-)

Photobucket

4. With the awl, carefully pull the bottom thread of yarn ABOVE the newly wrapped thread, and then OVER the peg. You will notice the "stitch" has disappeared down into the spool hole. Gently tug on the yarn tail to make the stitch tight. Move onto the next peg to your right.

5. Continue this motion around each peg of the spool. If you talk yourself through the motions it will sound something like this "Position, above, over, tug. Position, above, over, tug..."

Note: Tugging the tail is not required after each thread but I find doing it every now and then keeps the cord nice and tight :-)

After a few minutes you will notice the cord starting to poke out of the bottom of the spool, keep French knitting until the cord has reached the desired length!

French knitting can sound rather confusing, so to make things a little easier here is a video to demonstrate Steps: 3* - 5. This video was taken on my FIRST ATTEMPT so please excuse my slight shakiness, but as you can see.. it's very simple even for a beginner :-)


6. To cast off you will need to snip your yarn from the ball and position the "top section" as you would normally. When you pull the bottom thread ABOVE and OVER the peg, continue to pull the remaining (that is on the peg) yarn's loose tail through the stitch so it is no longer on the peg. Do this for the remaining 3 pegs and you will have successfully cast off!
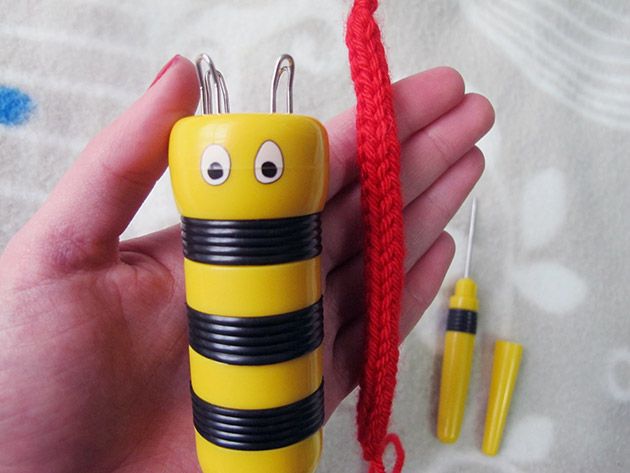
 photo Congratulations_zps27d5cd6f.jpg

Photobucket

 photo ThoughtsampReview_zpsd1b7b0e0.jpg

* Overall, how did you find French Knitting *
Initially, I found French Knitting to be a little daunting, I had to pay great attention to casting on and the knitting motion to make sure I was doing it correctly. Once I got in the "groove" my knitting became quite fluid and I increased greatly in speed. Although far more time intensive (in my opinion) than crochet I really like the end product; the woven cord is very pretty and the intricate design looks impressive.

* What were your thoughts on the "French Knitting Bee" product *
Very cute and eye catching! The French Knitting Bee is a little more fiddly than what I was used to, but it's all about PRACTICE, PRACTICE, PRACTICE. It does get easier and you will soon be watching TV while you French knit hehe, (plus there's no counting so feel free to chat away!!) The French Knitting Bee is very comfortable to handle and the rubber "bee stripes" make the spool easy to grip. The pegs are a very slippery so until you are a confident French knitting pay CLOSE attention to the "ABOVE the thread and OVER the peg" motion, as you don't want to un-thread all your hard work.

* Any suggestions? Improvements that could be made? *
If the pegs were shaped slightly different like this it would make the ABOVE and OVER step a lot easier as the yarn could catch and not slip off. The directions on the back of the packet assume you have knowledge on how to knit and list casting off as "cast off the same as knitting" - a little more detail would be very handy!

* Overall rating *
I really like this product and will continue to use it :-) I definitely recommend it to anyone who is wanting to learn a new skill. The woven cord looks really pretty and I have already incorporated it into a few of my upcoming store products. With a few little improvements the French Knitting Bee could move from a good product to a GREAT product.
3 acorns out of 5

 photo 3acorns_zpsc02fb3cc.gif

Hope you enjoyed this review and please feel free to post your experiences with the French Knitting Bee and any feedback :-)
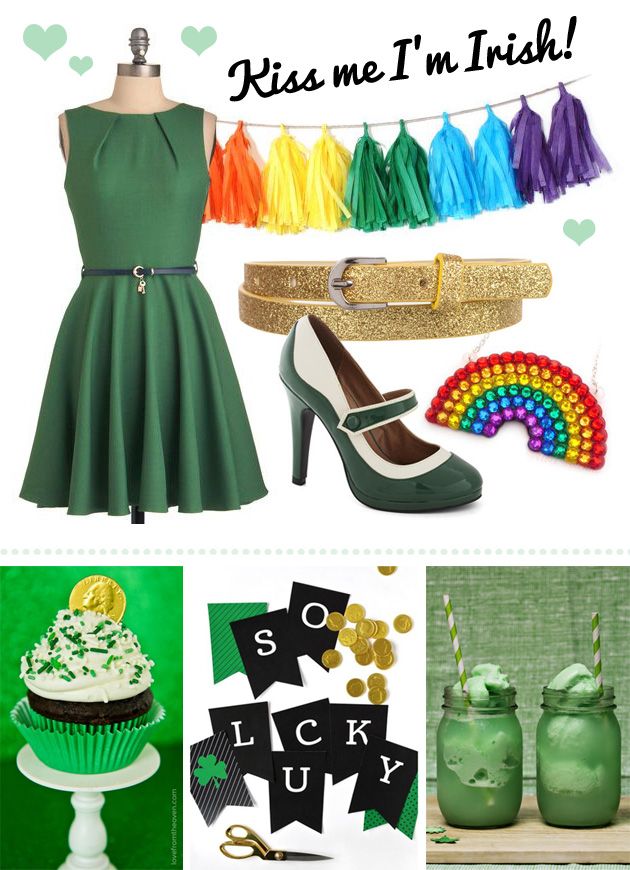
 photo signature.jpg

Monday, September 3, 2012

Diy Round-up: Working 9 - 5!

Working in a corporate environment can visually (at times) be a little lackluster for the creative eye... so if you're itching to personalise and add a little DIY charm to your office surroundings these projects will be perfect for you!

Photobucket
Make your own coordinating office supplies
via Allison's crafty and inspirational blog Dream {a little BIGGER} 

Photobucket
DIY notebooks via Gabi's blog Bee-inspired  - these would be super handy as I'm always writing to-do lists


Photobucket
Personalised sharpie mug via Elsie's popular blog A Beautiful Mess - now this DIY isn't directly "office" related but I think it would be super to personalise ("Amy's germs"?? haha!) your own work mug... I don't know hoooow many times my coffee mug has been pinched by a work colleague and used multiple times.

Photobucket

Will you be trying any of these DIYs? :-)

Photobucket

Thursday, August 23, 2012

To my dearest... Diy Greeting Card

Photobucket

Last weekend the lovely Laura (from Learn 2 Screen-print) and I caught up for a quiet afternoon tea and craft session. Gaining inspiration from Laura's plentiful supplies we created this cute deer greeting card. Using just a few materials and easy print making techniques you can make your own handmade cards for friends and family!

Let's get started shall we...

Photobucket

What you'll need:
♥ Card stock , A5 to be folded in half
♥ Patterned rubber stamp larger than your card face (you can buy these at your local craft store). We used the "Chevron" Darkroom Door background stamp
 Stamping ink - we used Tim Holtz "Antique Linen"
 Acrylic paint in a bold contrasting colour
♥ Metallic detail paint
♥ Craft knife/stanley knife
♥ Skewer
♥ Crafter roller
 Stencil cut from ezi cut stencil paper

Photobucket

Step 1: Take your rubber stamp and cover with your stamping ink. Pat repetitively over your stamp making sure the whole surface is evenly coated.

Photobucket


Step 2: With your inked stamp, line up the fold of the card with the edge of your stamp, then press it gently down onto the card. Apply pressure with your palms all over the back of the stamp. With a bit of force hold your palms down for at least 3 seconds in each spot, make sure you are not "rolling" or moving the stamp, as we don't want the print to be smudged.

Photobucket

Step 3: Once you've pressed the bejeebers out of your stamp, lift it up to reveal the print! :-) Looks great doesn't it?

Photobucket

Step 4: Take your animal stencil that you carefully cut out with a craft knife (you can use various clip art or pre-designed silhouettes if you're not comfortable drawing your own animals) and place it in the center of your card front - don't worry if it's not exact! Keep it in place by taping the corners down with masking tape.

Photobucket

Photobucket

Step 5: Load your roller with the contrasting acrylic paint. Lightly start to roll over your stencil to apply the colour, continue to roll until you are happy with the coverage.

Photobucket

Step 6: Remove your stencil to reveal your animal silhouette! I love how the pattern slightly peeks through the deer - adds a little character I think ;-) We are almost there!

Photobucket

Step 7: Using a skewer and your metallic detail paint, spot three small dots on the rear of the deer (or anywhere that suits your animal of choice..) Let dry. Fold in half then sit back and admire your work! :-)

Photobucket

Ta-dah the end result! :-) Handmade cards are perfect for any occasion (special or "not") and add a personalised and heart-filled touch to your gifts.  

Laura and I had a great time preparing, creating and photographing this project for you today! Hope it not only is inspiring but also demonstrates how easy it can be to make your own DIY greeting cards!

If you'd like to learn more about Laura and her Learn 2 Screen-print classes check out her website, class descriptions or add her on facebook... Laura is super lovely and such a inspiration!

Photobucket

Note: Please, please excuse my horrible nails!! I often pick at my nail polish and I was not expecting to star in a photo DIY - haha how embarrassing!

Monday, August 13, 2012

DIY Galaxy nails {video post}

Photobucket

This trend if everywhere at the moment...so why not have the galaxy at your fingertips ;-) 


This is my first video tutorial so it's a little blurry, a little awkward but I'm really excited to share this with you!  If you have any questions/feedback or future hints/tips please don't hesitate to leave your thoughts in the comment section :-) 

For those who would like written step-by-step instructions please see below :-)

What you'll need ♥:
♥ Selection of 'cosmic' colours:
I'm using Avon "Twilight Blue", China Glaze "Flying High", Zoya "Morgan" and Kit Cosmetic "Dive in"
♥ Craft or make-up sponge - I bought my sponge from my local Target (Pack of 32 for $5 GREAT PRICE!)
 Plastic lid or something similar to dot your lighter cosmic colours onto.

Step 1:
Paint your Galaxy background, I used my darkest shade, "Twilight blue"

Step 2:
Once your background colour is dry we can start applying the lighter cosmic colours - I started with the "Flyin' High" and gently dabbed the corner of my make up sponge in the nail polish.

Using the corner of the sponge, lightly dab against your nail to apply the nail polish. Do not cover the whole nail in this colour :-) Repeat on each nail, remember we don't want each nail to look the same so feel free to mix up the location. Keep dabbing until you are happy with the coverage. Don't worry if the nail polish is applying too thick, this will be fixed later on down the track by the constant dabbing.

Apply the remaining two colours in the same fashion as above ^ but use different corners of your make up sponge. I followed "Flying High" with "Morgan" and then used "Dive in" as the finishing colour - they look great together! 

Tip: Use the base of your make up sponge to thin out the polish - I found this to be very helpful. Let dry.

Step 3:
Add a little sparkle to your galaxy with glitter nail polishes! I used Chi Chi "Paparazzi Princess" and BYS "Silver moon" (how appropriate!) I love the mix of fine glitter from "Paparazzi Princess" and the large glitter chunks from "Silver Moon"

Ta-dah!! You now have galaxy nails :-)

Video info: I used a Canon PowerShot G12 to record and Adobe After Effects CS5 to compile (there's probably easier programs but I know how to use After Effects haha!) Music: Katy Perry E.T
Photobucket

Thursday, August 9, 2012

My new baby! Beldray 12 stitch sewing machine

Photobucket

Last week I purchased a Beldray 12 stitch sewing machine on Catch of the Day (for a steal of a price!) and to my surprise it arrived 2 days later on my doorstep. With easy to use functions and compact size (28cm in length) it's the perfect addition to my craft collection - I'll be able to start all the little craft projects I've been thinking up for months!

This stylish and contemporary Beldray 12 stitch sewing machine offers great value and is ideal for beginners with none or little sewing machine experience. The compact design and convenient carry handle makes it ideal for travel. In addition the Beldray comes complete with 32 assorted bobbins, nylon storage bag, bobbin drawer, built-in sewing light and thread cutter

Features:
12 built-in stitches for great variety
 Built in thread cutter
♥ Automatic bobbin winding
 Reverse function ideal for finishing
  Stitch pattern indicator for simplicity
  Built-in light for improved visibility
  64-piece thread set so you can sew from day one!
  Nylon carry bag
 Weight: 1.9kg
 Dimensions (cm): 26 x 10.5 x 28 (HxWxL)

With mixed reviews I'm hoping my experience with the Beldray 12 stitch will be positive as this little machine does everything I need in a sewing machine. I can't wait to start using it!

Do you have any beginner sewing patterns you think I should try? 

Photobucket

Sunday, July 15, 2012

Diy: Sugar lip scrub

Photobucket

Winter's icy temperatures and too-hot heating can wreck havoc on your skin causing unsightly dryness; to keep our lips soft and kissable regular TLC is a must! Parched lips are a big no-no for not only kissing but also applying lipstick..I don't know how many times I forgo wearing my favourite shade because my lips weren't in tip-top condition.

For years my mother has used hand moisturiser and raw sugar to exfoliate her hands, a similar DIY approach can be taken to effectively exfoliate your lips.

To transform your lips from chapped to lustrous all you need is..

1 tablespoon raw sugar (white sugar also works but I prefer raw as it's rather coarse)
♥ 1 tablespoon honey
♥ 1 teaspoon vaseline

Mix together our 3 ingredients together in a small mixing bowl (add more sugar if you'd prefer a thick and grainy mixture) and apply a small fingertip amount gently to your chapped lips. Make small circular motions all over your lips until the mixture dissolves and you're done!

This super simple beauty trick works surprisingly well and takes less than 5 minutes, I do this every 3 weeks (or so) and it's become part of my regular beauty routine. The above quantity is more than enough for at least 3 scrub sessions so make sure you have a small air-tight container on hand! 

Do you have any home beauty routines you'd like to share?

Photobucket

Saturday, June 23, 2012

Diy Round-up: Brighten your home!

Home decor DIYs are my favourite! I love transforming objects around the house to add a little personality and cheer to my surroundings. With an icy average of 10 degrees during the Winter months in my hometown, I can't think of a better reason to try these DIYs and brighten my home!


Photobucket Pastel bunny jars via Torie on her gorgeous blog

PhotobucketGeometric photo art via Elsie's blog, A Beautiful Mess


PhotobucketAnd lastly my favorite, Screen-printed curtains via from fellow Ballaratian, Steph Wallace, co-owner of, Red Brick Gallery

How do you escape the Winter chill and cheer up your home?

Photobucket

Tuesday, June 12, 2012

Diy - Studded loafer slippers

Photobucket

Are you a girly girl who wouldn't mind getting a little tough? If so, you're much like me! I can usually be found in cutesy ballet flats... But of late, have toyed with the idea of popping on some studded kicks and showing my inner wild child. Zara, Topshop and Jeffery Campbell have GREAT studden slippers you can buy online - but where's the DIY fun in that?

Today I'm going to show you how I transformed a plain pair of
 loafer slippers into your new favourite shoes!

Photobucket

Photobucket

Photobucket

Photobucket

Photobucket

Photobucket

Photobucket

Photobucket

Photobucket

Things you'll need:
♥ Affordable pair of loafer slippers (I purchased mine from Aussie retailer, K-mart for $12. BARGAIN!)
♥ 10mm Pyramid studs (eBay seller Beach Heya has a fantastic variety of studs at a nice price)
Measuring tape
Grey lead pencil

Take a good look at your current slippers, oh what a bore they are. Say your goodbyes because you are never going to look at these babies in the same way.

1. Measure the width of your shoe near the top section and mark the centre point with your grey lead pencil.

2. Take one of your 10mm pyramid studs and place where you marked with your grey lead. Gently push the prong spikes through the material of your shoe, remember - be careful of your fingers. When the stud is pushed through, carefully bend the back of the stud on itself (You may find a pair of small nail scissors helpful).

3. Evenly adhere 2 more studs (1 on each side) of the centre stud to create a straight line of 3 studs.

4. Place another 2 studs underneath the line of 3; leaving a small and even gap. Push and bend studs into place. You will now notice a slight triangle shape.

5. Centre 1 more stud underneath the 2 studs you just placed and yay, you have completed your first shoe!

6. Repeat on the other shoe.

Now you have your own DIY studded loafers! Hope you feel as badass as I did in these babies hehe!

Photobucket