

Last weekend the lovely Laura (from Learn 2 Screen-print) and I caught up for a quiet afternoon tea and craft session. Gaining inspiration from Laura's plentiful supplies we created this cute deer greeting card. Using just a few materials and easy print making techniques you can make your own handmade cards for friends and family!
Let's get started shall we...
Let's get started shall we...

What you'll need:
♥ Card stock , A5 to be folded in half
♥ Patterned rubber stamp larger than your card face (you can buy these at your local craft store). We used the "Chevron" Darkroom Door background stamp
♥ Stamping ink - we used Tim Holtz "Antique Linen"
♥ Acrylic paint in a bold contrasting colour
♥ Metallic detail paint
♥ Craft knife/stanley knife
♥ Skewer
♥ Crafter roller
♥ Stencil cut from ezi cut stencil paper

Step 1: Take your rubber stamp and cover with your stamping ink. Pat repetitively over your stamp making sure the whole surface is evenly coated.

Step 2: With your inked stamp, line up the fold of the card with the edge of your stamp, then press it gently down onto the card. Apply pressure with your palms all over the back of the stamp. With a bit of force hold your palms down for at least 3 seconds in each spot, make sure you are not "rolling" or moving the stamp, as we don't want the print to be smudged.

Step 3: Once you've pressed the bejeebers out of your stamp, lift it up to reveal the print! :-) Looks great doesn't it?

Step 4: Take your animal stencil that you carefully cut out with a craft knife (you can use various clip art or pre-designed silhouettes if you're not comfortable drawing your own animals) and place it in the center of your card front - don't worry if it's not exact! Keep it in place by taping the corners down with masking tape.


Step 5: Load your roller with the contrasting acrylic paint. Lightly start to roll over your stencil to apply the colour, continue to roll until you are happy with the coverage.

Step 6: Remove your stencil to reveal your animal silhouette! I love how the pattern slightly peeks through the deer - adds a little character I think ;-) We are almost there!

Step 7: Using a skewer and your metallic detail paint, spot three small dots on the rear of the deer (or anywhere that suits your animal of choice..) Let dry. Fold in half then sit back and admire your work! :-)
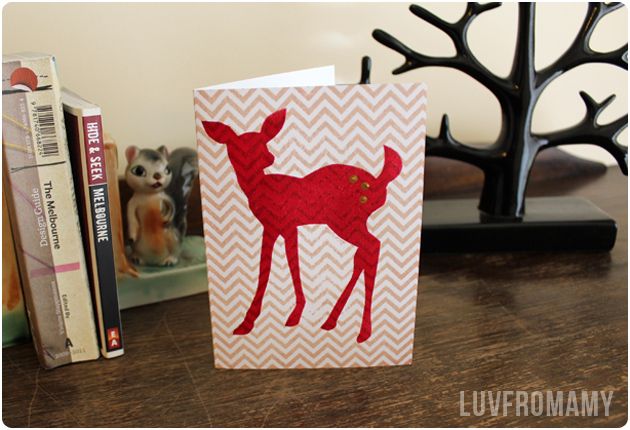

Ta-dah the end result! :-) Handmade cards are perfect for any occasion (special or "not") and add a personalised and heart-filled touch to your gifts.
Laura and I had a great time preparing, creating and photographing this project for you today! Hope it not only is inspiring but also demonstrates how easy it can be to make your own DIY greeting cards!
If you'd like to learn more about Laura and her Learn 2 Screen-print classes check out her website, class descriptions or add her on facebook... Laura is super lovely and such a inspiration!

Note: Please, please excuse my horrible nails!! I often pick at my nail polish and I was not expecting to star in a photo DIY - haha how embarrassing!
Looks great Ami!! I was looking forward to another video but this is still really cool :-) Such a clever girl!
ReplyDeleteThanks Sami! :-) We had lots of fun making this. We will build up to doing video DIYs but it might take a little while - watch this space hehe! :P
DeleteNice work Amy! PS love your nail polish!
ReplyDeleteThank you! :-) Hahaha chipped nail polish is totally in fashion right?? :: blushes ::
DeleteWhoa! This is so adorable and simple! Thanks for sharing! <3
ReplyDeleteThanks for the kind words Maranda :-) If you make any cards I'd love to see the final result!! x
DeleteLove this Amy! Turned out so neat. I didn't realise the background was a stamp when I first saw the card, but that's such a great way to do it and get a bit more texture to the print!
ReplyDeletex
Thanks Bianka! There are so many stamps you can get so the possibilities are endless - I can't wait to try out some more :P
DeleteSo cute! I love it!
ReplyDeleteThank you! I appreciate your lovely comments! :-)
DeleteI'm inspired! I want to make some holiday cards this year and I love your deer stencil idea!! So cute!!
ReplyDelete